本文介紹了veth-pair和它的連通性,以及兩個(gè) Namespace 之間的連通性.
01 veth-pair 是什么
顧名思義,veth-pair 就是一對的虛擬設(shè)備接口,和 tap/tun 設(shè)備不同的是,它都是成對出現(xiàn)的。一端連著協(xié)議棧,一端彼此相連著。如下圖所示:

正因?yàn)橛羞@個(gè)特性,它常常充當(dāng)著一個(gè)橋梁,連接著各種虛擬網(wǎng)絡(luò)設(shè)備,典型的例子像“兩個(gè) namespace 之間的連接”,“Bridge、OVS 之間的連接”,“docker 容器之間的連接” 等等,以此構(gòu)建出非常復(fù)雜的虛擬網(wǎng)絡(luò)結(jié)構(gòu),比如 openstack Neutron。
02 veth-pair 的連通性
我們給上圖中的 veth0 和 veth1 分別配上 IP:10.1.1.2 和 10.1.1.3,然后從 veth0 ping 一下 veth1。理論上它們處于同網(wǎng)段,是能 ping 通的,但結(jié)果卻是 ping 不通。
抓個(gè)包看看,tcpdump -nnt -i veth0
root@ubuntu:~# tcpdump -nnt -i veth0 tcpdump: verbose output suppressed, use -v or -vv for full protocol decode listening on veth0, link-type EN10MB (Ethernet), capture size 262144 bytes ARP, Request who-has 10.1.1.3 tell 10.1.1.2, length 28 ARP, Request who-has 10.1.1.3 tell 10.1.1.2, length 28
可以看到,由于 veth0 和 veth1 處于同一個(gè)網(wǎng)段,且是第一次連接,所以會(huì)事先發(fā) ARP 包,但 veth1 并沒有響應(yīng) ARP 包。
經(jīng)查閱,這是由于我使用的 Ubuntu 系統(tǒng)內(nèi)核中一些 ARP 相關(guān)的默認(rèn)配置限制所導(dǎo)致的,需要修改一下配置項(xiàng):
echo 1 > /proc/sys/net/ipv4/conf/veth1/accept_local echo 1 > /proc/sys/net/ipv4/conf/veth0/accept_local echo 0 > /proc/sys/net/ipv4/conf/all/rp_filter echo 0 > /proc/sys/net/ipv4/conf/veth0/rp_filter echo 0 > /proc/sys/net/ipv4/conf/veth1/rp_filter
完了再 ping 就行了。
root@ubuntu:~# ping -I veth0 10.1.1.3 -c 2 PING 10.1.1.3 (10.1.1.3) from 10.1.1.2 veth0: 56(84) bytes of data. 64 bytes from 10.1.1.3: icmp_seq=1 ttl=64 time=0.047 ms 64 bytes from 10.1.1.3: icmp_seq=2 ttl=64 time=0.064 ms --- 10.1.1.3 ping statistics --- 2 packets transmitted, 2 received, 0% packet loss, time 3008ms rtt min/avg/max/mdev = 0.047/0.072/0.113/0.025 ms
我們對這個(gè)通信過程比較感興趣,可以抓包看看。
對于 veth0 口:
root@ubuntu:~# tcpdump -nnt -i veth0 tcpdump: verbose output suppressed, use -v or -vv for full protocol decode listening on veth0, link-type EN10MB (Ethernet), capture size 262144 bytes ARP, Request who-has 10.1.1.3 tell 10.1.1.2, length 28 ARP, Reply 10.1.1.3 is-at 5a:07:76:8e:fb:cd, length 28 IP 10.1.1.2 > 10.1.1.3: ICMP echo request, id 2189, seq 1, length 64 IP 10.1.1.2 > 10.1.1.3: ICMP echo request, id 2189, seq 2, length 64 IP 10.1.1.2 > 10.1.1.3: ICMP echo request, id 2189, seq 3, length 64 IP 10.1.1.2 > 10.1.1.3: ICMP echo request, id 2244, seq 1, length 64
對于 veth1 口:
root@ubuntu:~# tcpdump -nnt -i veth1 tcpdump: verbose output suppressed, use -v or -vv for full protocol decode listening on veth1, link-type EN10MB (Ethernet), capture size 262144 bytes ARP, Request who-has 10.1.1.3 tell 10.1.1.2, length 28 ARP, Reply 10.1.1.3 is-at 5a:07:76:8e:fb:cd, length 28 IP 10.1.1.2 > 10.1.1.3: ICMP echo request, id 2189, seq 1, length 64 IP 10.1.1.2 > 10.1.1.3: ICMP echo request, id 2189, seq 2, length 64 IP 10.1.1.2 > 10.1.1.3: ICMP echo request, id 2189, seq 3, length 64 IP 10.1.1.2 > 10.1.1.3: ICMP echo request, id 2244, seq 1, length 64
奇怪,我們并沒有看到 ICMP 的 echo reply 包,那它是怎么 ping 通的?
其實(shí)這里 echo reply 走的是 localback 口,不信抓個(gè)包看看:
root@ubuntu:~# tcpdump -nnt -i lo tcpdump: verbose output suppressed, use -v or -vv for full protocol decode listening on lo, link-type EN10MB (Ethernet), capture size 262144 bytes IP 10.1.1.3 > 10.1.1.2: ICMP echo reply, id 2244, seq 1, length 64 IP 10.1.1.3 > 10.1.1.2: ICMP echo reply, id 2244, seq 2, length 64 IP 10.1.1.3 > 10.1.1.2: ICMP echo reply, id 2244, seq 3, length 64 IP 10.1.1.3 > 10.1.1.2: ICMP echo reply, id 2244, seq 4, length 64
為什么?
我們看下整個(gè)通信流程就明白了。
- 首先 ping 程序構(gòu)造 ICMP echo request,通過 socket 發(fā)給協(xié)議棧。
- 由于 ping 指定了走 veth0 口,如果是第一次,則需要發(fā) ARP 請求,否則協(xié)議棧直接將數(shù)據(jù)包交給 veth0。
- 由于 veth0 連著 veth1,所以 ICMP request 直接發(fā)給 veth1。
- veth1 收到請求后,交給另一端的協(xié)議棧。
- 協(xié)議棧看本地有 10.1.1.3 這個(gè) IP,于是構(gòu)造 ICMP reply 包,查看路由表,發(fā)現(xiàn)回給 10.1.1.0 網(wǎng)段的數(shù)據(jù)包應(yīng)該走 localback 口,于是將 reply 包交給 lo 口(會(huì)優(yōu)先查看路由表的 0 號(hào)表,ip route show table 0 查看)。
- lo 收到協(xié)議棧的 reply 包后,啥都沒干,轉(zhuǎn)手又回給協(xié)議棧。
- 協(xié)議棧收到 reply 包之后,發(fā)現(xiàn)有 socket 在等待包,于是將包給 socket。
- 等待在用戶態(tài)的 ping 程序發(fā)現(xiàn) socket 返回,于是就收到 ICMP 的 reply 包。
整個(gè)過程如下圖所示:

03 兩個(gè) namespace 之間的連通性
namespace 是 linux 2.6.x 內(nèi)核版本之后支持的特性,主要用于資源的隔離。有了 namespace,一個(gè) Linux 系統(tǒng)就可以抽象出多個(gè)網(wǎng)絡(luò)子系統(tǒng),各子系統(tǒng)間都有自己的網(wǎng)絡(luò)設(shè)備,協(xié)議棧等,彼此之間互不影響。
如果各個(gè) namespace 之間需要通信,怎么辦呢,答案就是用 veth-pair 來做橋梁。
根據(jù)連接的方式和規(guī)模,可以分為“直接相連”,“通過 Bridge 相連” 和 “通過 OVS 相連”。
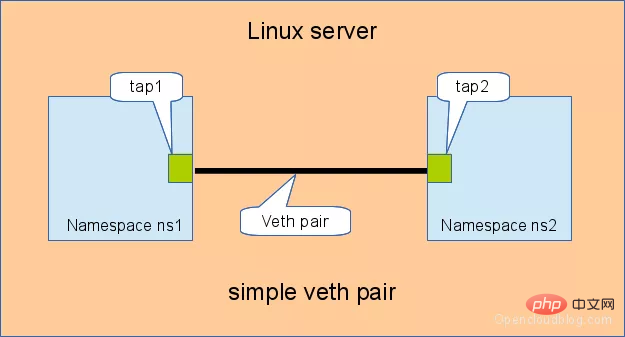
3.1 直接相連
直接相連是最簡單的方式,如下圖,一對 veth-pair 直接將兩個(gè) namespace 連接在一起。

給 veth-pair 配置 IP,測試連通性:
# 創(chuàng)建 namespace ip netns a ns1 ip netns a ns2 # 創(chuàng)建一對 veth-pair veth0 veth1 ip l a veth0 type veth peer name veth1 # 將 veth0 veth1 分別加入兩個(gè) ns ip l s veth0 netns ns1 ip l s veth1 netns ns2 # 給兩個(gè) veth0 veth1 配上 IP 并啟用 ip netns exec ns1 ip a a 10.1.1.2/24 dev veth0 ip netns exec ns1 ip l s veth0 up ip netns exec ns2 ip a a 10.1.1.3/24 dev veth1 ip netns exec ns2 ip l s veth1 up # 從 veth0 ping veth1 [root@localhost ~]# ip netns exec ns1 ping 10.1.1.3 PING 10.1.1.3 (10.1.1.3) 56(84) bytes of data. 64 bytes from 10.1.1.3: icmp_seq=1 ttl=64 time=0.073 ms 64 bytes from 10.1.1.3: icmp_seq=2 ttl=64 time=0.068 ms --- 10.1.1.3 ping statistics --- 15 packets transmitted, 15 received, 0% packet loss, time 14000ms rtt min/avg/max/mdev = 0.068/0.084/0.201/0.032 ms
3.2 通過 Bridge 相連
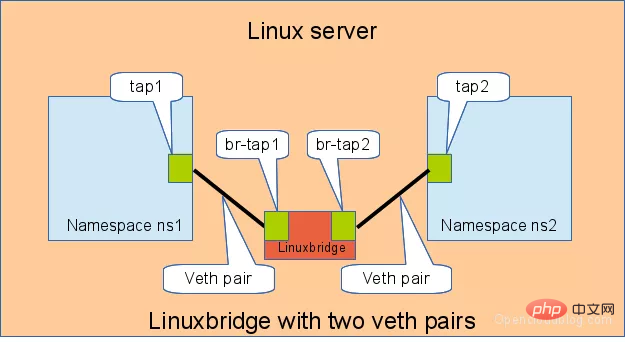
Linux Bridge 相當(dāng)于一臺(tái)交換機(jī),可以中轉(zhuǎn)兩個(gè) namespace 的流量,我們看看 veth-pair 在其中扮演什么角色。
如下圖,兩對 veth-pair 分別將兩個(gè) namespace 連到 Bridge 上。

同樣給 veth-pair 配置 IP,測試其連通性:
# 首先創(chuàng)建 bridge br0 ip l a br0 type bridge ip l s br0 up # 然后創(chuàng)建兩對 veth-pair ip l a veth0 type veth peer name br-veth0 ip l a veth1 type veth peer name br-veth1 # 分別將兩對 veth-pair 加入兩個(gè) ns 和 br0 ip l s veth0 netns ns1 ip l s br-veth0 master br0 ip l s br-veth0 up ip l s veth1 netns ns2 ip l s br-veth1 master br0 ip l s br-veth1 up # 給兩個(gè) ns 中的 veth 配置 IP 并啟用 ip netns exec ns1 ip a a 10.1.1.2/24 dev veth0 ip netns exec ns1 ip l s veth0 up ip netns exec ns2 ip a a 10.1.1.3/24 dev veth1 ip netns exec ns2 ip l s veth1 up # veth0 ping veth1 [root@localhost ~]# ip netns exec ns1 ping 10.1.1.3 PING 10.1.1.3 (10.1.1.3) 56(84) bytes of data. 64 bytes from 10.1.1.3: icmp_seq=1 ttl=64 time=0.060 ms 64 bytes from 10.1.1.3: icmp_seq=2 ttl=64 time=0.105 ms --- 10.1.1.3 ping statistics --- 2 packets transmitted, 2 received, 0% packet loss, time 999ms rtt min/avg/max/mdev = 0.060/0.082/0.105/0.024 ms
3.3 通過 OVS 相連
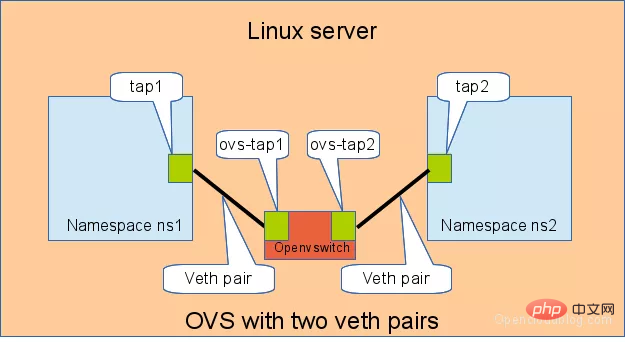
OVS 是第三方開源的 Bridge,功能比 Linux Bridge 要更強(qiáng)大,對于同樣的實(shí)驗(yàn),我們用 OVS 來看看是什么效果。
如下圖所示:

同樣測試兩個(gè) namespace 之間的連通性:
# 用 ovs 提供的命令創(chuàng)建一個(gè) ovs bridge ovs-vsctl add-br ovs-br # 創(chuàng)建兩對 veth-pair ip l a veth0 type veth peer name ovs-veth0 ip l a veth1 type veth peer name ovs-veth1 # 將 veth-pair 兩端分別加入到 ns 和 ovs bridge 中 ip l s veth0 netns ns1 ovs-vsctl add-port ovs-br ovs-veth0 ip l s ovs-veth0 up ip l s veth1 netns ns2 ovs-vsctl add-port ovs-br ovs-veth1 ip l s ovs-veth1 up # 給 ns 中的 veth 配置 IP 并啟用 ip netns exec ns1 ip a a 10.1.1.2/24 dev veth0 ip netns exec ns1 ip l s veth0 up ip netns exec ns2 ip a a 10.1.1.3/24 dev veth1 ip netns exec ns2 ip l s veth1 up # veth0 ping veth1 [root@localhost ~]# ip netns exec ns1 ping 10.1.1.3 PING 10.1.1.3 (10.1.1.3) 56(84) bytes of data. 64 bytes from 10.1.1.3: icmp_seq=1 ttl=64 time=0.311 ms 64 bytes from 10.1.1.3: icmp_seq=2 ttl=64 time=0.087 ms ^C --- 10.1.1.3 ping statistics --- 2 packets transmitted, 2 received, 0% packet loss, time 999ms rtt min/avg/max/mdev = 0.087/0.199/0.311/0.112 ms
相關(guān)課程推薦:Linux視頻教程
總結(jié)
veth-pair 在虛擬網(wǎng)絡(luò)中充當(dāng)著橋梁的角色,連接多種網(wǎng)絡(luò)設(shè)備構(gòu)成復(fù)雜的網(wǎng)絡(luò)。
veth-pair 的三個(gè)經(jīng)典實(shí)驗(yàn),直接相連、通過 Bridge 相連和通過 OVS 相連。
參考
http://www.opencloudblog.com/?p=66
https://segmentfault.com/a/1190000009251098
.jpg)


.png)
