oracle數(shù)據(jù)庫欄目介紹裝Oracle11g數(shù)據(jù)庫的方法

1、準備環(huán)境:
centos 7.5操作系統(tǒng)最小化安裝;物理內(nèi)存8GB,硬盤100G;安裝目錄:/oracle
安裝包:注意根據(jù)系統(tǒng),下載對應的包(32位,64位)
linux.x64_11gR2_database_1of2.zip
linux.x64_11gR2_database_2of2.zip
在/etc/hosts文件中增加主機名(通過hostname獲得)到回環(huán)IP的映射如下:
192.168.31.162 ? oracle ? ?#本機IP ?主機名
關閉selinux和防火墻
[root@oracle ~]# setenforce 0 #臨時 [root@oracle ~]# sed -i "/SELINUX=/s/enforcing/disabled/" /etc/selinux/config #永久關閉selinux [root@oracle ~]# getenforce Disabled [root@oracle ~]# systemctl stop firewalld [root@oracle ~]# systemctl disable firewalld
2、安裝依賴包:
[root@oracle ~]# yum -y install gcc make binutils gcc-c++ [root@oracle ~]#yum -y install compat-libstdc++-33 elfutils-libelf-devel elfutils-libelf-devel-static [root@oracle ~]# yum -y install ksh libaio libaio-devel numactl-devel sysstat [root@oracle ~]# yum -y install unixODBC unixODBC-devel pcre-devel
3、解包:
[root@oracle ~]# cd /oracle/ [root@oracle oracle]# unzip linux.x64_11gR2_database_1of2.zip [root@oracle oracle]# unzip linux.x64_11gR2_database_2of2.zip 注,解包后在該目錄下會有一個database目錄
4、準備安裝用戶及組:
[root@oracle oracle]# groupadd oinstall [root@oracle oracle]# groupadd dba [root@oracle oracle]# useradd -g oinstall -G dba -d /home/oracle oracle [root@oracle oracle]# passwd oracle [root@oracle oracle]# id oracle uid=1000(oracle) gid=1000(oinstall) 組=1000(oinstall),1001(dba)
5、修改內(nèi)核參數(shù):
[root@oracle oracle]# vim /etc/sysctl.conf 添加 fs.aio-max-nr = 1048576 fs.file-max = 6553600 kernel.shmall = 2097152 kernel.shmmax = 2147483648 kernel.shmmni = 4096 kernel.sem = 250 32000 100 128 net.ipv4.ip_local_port_range = 1024 65000 net.core.rmem_default = 262144 net.core.rmem_max = 4194304 net.core.wmem_default = 262144 net.core.wmem_max = 1048586 [root@oracle oracle]# /sbin/sysctl –p 文件生效
6、修改用戶限制文件:
[root@oracle oracle]# vim /etc/security/limits.conf 添加 oracle soft nproc 2047 oracle hard nproc 16384 oracle soft nofile 1024 oracle hard nofile 65536 oracle soft stack 10240 [root@oracle oracle]# vim /etc/pam.d/login 添加 session required /lib64/security/pam_limits.so 這里有個注意點,那個64指64位系統(tǒng),不能省略 session required pam_limits.so [root@oracle oracle]# vim /etc/profile 添加 if [ $USER = "oracle" ]; then if [ $SHELL = "/bin/ksh" ]; then ulimit -p 16384 ulimit -n 65536 else ulimit -u 16384 -n 65536 fi fi
7、手動創(chuàng)建安裝文檔及設置權限:
[root@oracle oracle]# mkdir /oracle/oracle [root@oracle oracle]# mkdir /oracle/oracle/11.2.0 數(shù)據(jù)庫系統(tǒng)安裝目錄 [root@oracle oracle]# mkdir /oracle/oradata 數(shù)據(jù)庫數(shù)據(jù)安裝目錄 [root@oracle oracle]# mkdir /oracle/oradata_back 數(shù)據(jù)備份目錄 [root@oracle oracle]# mkdir /home/oracle/inventory 清單目錄 [root@oracle oracle]# chown -R oracle.oinstall /oracle/oracle [root@oracle oracle]# chown -R oracle.oinstall /oracle/oracle /home/oracle/ [root@oracle oracle]# chmod -R 775 /oracle/oracle
8、編輯靜默安裝文件(非圖像界面):
[root@oracle oracle]# su - oracle [oracle@oracle ~]$ cp -R /oracle/database/response/ /home/oracle/ [oracle@oracle ~]$ cd /home/oracle/response/ [oracle@oracle response]$ mv db_install.rsp db_install_swonly.rsp 因為下面的安裝是只安裝軟件不安裝啟動數(shù)據(jù)庫實例,所以改個名字以提示自己 [oracle@oracle response]$vim db_install_swonly.rsp 29 oracle.install.option=INSTALL_DB_SWONLY ##3選1 37 ORACLE_HOSTNAME=oracle 42 UNIX_GROUP_NAME=oinstall 47 INVENTORY_LOCATION=/home/oracle/inventory 99 oracle.install.db.InstallEdition=EE oracle.install.db.customComponents=oracle.server:11.2.0.1.0, //保持系統(tǒng)默認值 oracle.sysman.ccr:10.2.7.0.0,oracle.xdk:11.2.0.1.0,oracle.rdbms.oci:11.2.0.1.0, oracle.network:11.2.0.1.0,oracle.network.listener:11.2.0.1.0,oracle.rdbms:11.2.0.1.0, oracle.options:11.2.0.1.0,oracle.rdbms.partitioning:11.2.0.1.0, oracle.oraolap:11.2.0.1.0,oracle.rdbms.dm:11.2.0.1.0, oracle.rdbms.dv:11.2.0.1.0,orcle.rdbms.lbac:11.2.0.1.0, oracle.rdbms.rat:11.2.0.1.0 142 oracle.install.db.DBA_GROUP=dba 147 oracle.install.db.OPER_GROUP=dba 385 DECLINE_SECURITY_UPDATES=true
9、根據(jù)響應文件安裝oracle:
[oracle@oracle oracle]$ cd /oracle/database/ [oracle@oracle database]$ ./runInstaller -silent -ignorePrereq -responseFile /home/oracle/response/db_install_swonly.rsp
如果報: ./runInstaller: /data/oracle/database/install/.oui: /lib/ld-linux.so.2: bad ELF interpreter: 沒有那個文件或目錄
解決方法:yum ? install -y ld-linux.so.2
注:安裝過程中,如果提示[warning]不必理會,程序仍在安裝,如果提示【fatal】,則安裝停止。另開終端查看日志,查看(也可以查看安裝進度)報錯信息:tail ?–f ?/home/oracle/inventory/logs/installActions2018-11-04_11-16-12PM.log
當出現(xiàn):Successfully Setup Software. ? 表示安裝成功
Exit退出以root身份執(zhí)行下面兩個腳本初始化:
[root@oracle database]# cd /home/oracle/inventory/ [root@oracle inventory]# ./orainstRoot.sh #注:重裝oracle前,刪除/etc/oraInst.loc文件,否則沒有./orainstRoot.sh [root@oracle inventory]# cd /oracle/oracle/11.2.0/ [root@oracle 11.2.0]# ./root.sh
10、編輯靜默建庫響應文件(建庫):
[oracle@oracle ~]$ cd /home/oracle/response/ [oracle@oracle response]$ mv dbca.rsp dbca_hello.rsp 實例名 [oracle@oracle ~]$ vim .bash_profile 設置用戶變量,否測沒有命令 export ORACLE_BASE=/oracle/oracle export ORACLE_HOME=/oracle/oracle/11.2.0 export ORACLE_SID=hello PATH=$PATH:$HOME/.local/bin:$HOME/bin:/oracle/oracle/11.2.0/bin/ [oracle@oracle ~]$ vim /home/oracle/response/dbca_hello.rsp 建庫建實例 78 GDBNAME = "orcl11g" 數(shù)據(jù)庫名字 ###192.168.1.201 yfpw 149 SID = "hello" 實例名 ###192.168.1.201 orcl 190 SYSPASSWORD = "password" 管理員密碼 200 SYSTEMPASSWORD = "password" 管理員密碼 357 DATAFILEDESTINATION = /oracle/oracle 數(shù)據(jù)文件存放目錄 367 RECOVERYAREADESTINATION= /oracle/oradata_back 數(shù)據(jù)備份目錄 415 CHARACTERSET = "ZHS16GBK" 字符集,重要!!! 建庫后一般不能更改,所以建庫前要確定清楚。 ###我司線上為:AMERICAN_AMERICA.AL32UTF8 540 TOTALMEMORY = "5120" 設置內(nèi)存5120M
11、配置靜默監(jiān)聽:
[oracle@oracle ~]$ netca /silent /responsefile /home/oracle/response/netca.rsp 正在對命令行參數(shù)進行語法分析: 參數(shù)"silent" = true 參數(shù)"responsefile" = /home/oracle/response/netca.rsp 完成對命令行參數(shù)進行語法分析。 Oracle Net Services 配置: 完成概要文件配置。 Oracle Net 監(jiān)聽程序啟動: 正在運行監(jiān)聽程序控制: /oracle/oracle/11.2.0/bin/lsnrctl start LISTENER 監(jiān)聽程序控制完成。 監(jiān)聽程序已成功啟動。 監(jiān)聽程序配置完成。 成功完成 Oracle Net Services 配置。退出代碼是0 成功運行后(退出代碼是0),在/oracle/oracle/11.2.0/network/admin目錄下生成sqlnet.ora和listener.ora兩個文件,通過命令netstat –ntlp 可以看到服務端口1521,說明監(jiān)聽器已經(jīng)在1521端口上開始工作了。
十二起庫起實例:
[oracle@oracle admin]$ dbca -silent -responseFile /home/oracle/response/dbca_hello.rsp 復制數(shù)據(jù)庫文件 1% 已完成 3% 已完成 11% 已完成 18% 已完成 26% 已完成 37% 已完成 正在創(chuàng)建并啟動 Oracle 實例 40% 已完成 45% 已完成 50% 已完成 55% 已完成 56% 已完成 60% 已完成 62% 已完成 正在進行數(shù)據(jù)庫創(chuàng)建 66% 已完成 70% 已完成 73% 已完成 85% 已完成 96% 已完成 100% 已完成
有關詳細信息, 請參閱日志文件 “/oracle/oracle/cfgtoollogs/dbca/orcl11g/orcl11g.log”。
13、配置監(jiān)聽TNS監(jiān)聽串(方便plsql等第三方軟件管理):
[oracle@oracle ~]$ cd /oracle/oracle/11.2.0/network/admin/ [oracle@oracle admin]$ vim listener.ora 添加監(jiān)聽串 SID_LIST_LISTENER = (SID_LIST = (SID_DESC = (SID_NAME = hello) sid實例名 (ORACLE_HOME = /oracle/oracle/11.2.0) 家目錄 ) ) [oracle@oracle admin]$ lsnrctl status Listening Endpoints Summary... (DESCRIPTION=(ADDRESS=(PROTOCOL=ipc)(KEY=EXTPROC1521))) (DESCRIPTION=(ADDRESS=(PROTOCOL=tcp)(HOST=localhost)(PORT=1521))) Services Summary... Service "helloXDB" has 1 instance(s). Instance "hello", status READY, has 1 handler(s) for this service... Service "orcl11g" has 1 instance(s). Instance "hello", status READY, has 1 handler(s) for this service... The command completed successfully 即監(jiān)聽成功 [<u>https://www.cnblogs.com/softidea/p/3912369.html</u>](https://www.cnblogs.com/softidea/p/3912369.html)
14、進入數(shù)據(jù)庫,默認無需密碼:
[oracle@oracle admin]$ sqlplus / as sysdba SQL*Plus: Release 11.2.0.1.0 Production on Mon Nov 5 00:42:01 2018 Copyright (c) 1982, 2009, Oracle. All rights reserved. Connected to: Oracle Database 11g Enterprise Edition Release 11.2.0.1.0 - 64bit Production With the Partitioning, OLAP, Data Mining and Real Application Testing options SQL> SQL> shutdown immediate; 關閉實例 SQL> startup 開啟實例 SQL> exit 退出
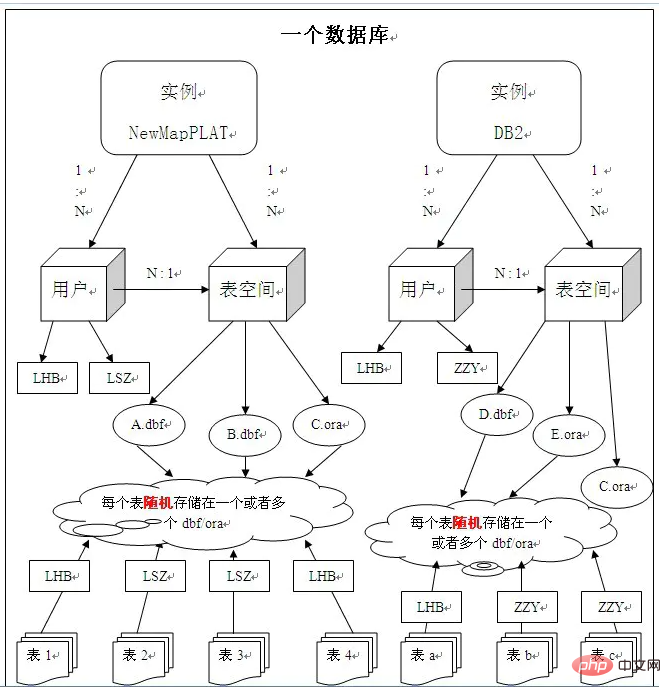
另附orecle結構圖一張:

補充
su - oracle sqlplus /nolog; (sqlplus 用戶名/密碼;) select table_name from user_tables; //當前用戶的表 1、su – oracle 不是必需,適合于沒有DBA密碼時使用,可以不用密碼來進入sqlplus界面。 2、sqlplus /nolog 或sqlplus system/manager 或./sqlplus ; 3、SQL>connect / as sysdba ;(as sysoper)或 connect internal/oracle AS SYSDBA ;(scott/tiger) conn sys/change_on_install as sysdba; 4、SQL>startup; 啟動數(shù)據(jù)庫實例 5、 查看當前的所有數(shù)據(jù)庫: select * from v$database;


