“);? if?(l)?{? m.insertBefore(l);? l.remove()? }?else?{? i.insertElement(m)? }? },
三、然后新建images文件夾,存放一個(gè)syntaxhighlight.gif圖片文件,該圖片文件在編輯器工具欄上顯示,可以使用16*16像素的圖片?
四、新建lang文件夾,是語言包,里面有兩個(gè)文件,一個(gè)是中文cn.js一個(gè)是英文en.js,代碼內(nèi)容如下:?
en.js代碼如下:?
代碼如下:
CKEDITOR.plugins.setLang('syntaxhighlight',?'en',? {? syntaxhighlight:? {? title:?'Add?or?update?a?code?snippet',? sourceTab:?'Source?code',? langLbl:?'Select?language',? advancedTab:?'Advanced',? hideGutter:?'Hide?gutter',? hideGutterLbl:?'Hide?gutter?&?line?numbers.',? hideControls:?'Hide?controls',? hideControlsLbl:?'Hide?code?controls?at?the?top?of?the?code?block.',? collapse:?'Collapse',? collapseLbl:?'Collapse?the?code?block?by?default.?(controls?need?to?be?turned?on)',? showColumns:?'Show?columns',? showColumnsLbl:?'Show?row?columns?in?the?first?line.',? lineWrap:?'Disable?line?wrapping',? lineWrapLbl:?'Switch?off?line?wrapping.',? lineCount:?'Default?line?count',? highlight:?'Highlight?lines',? highlightLbl:?'Enter?a?comma?seperated?lines?of?lines?you?want?to?highlight,?eg?<em>3,10,15</em>.'? }? });
cn.js代碼如下:?
代碼如下:
CKEDITOR.plugins.setLang('syntaxhighlight',?'cn',? {? syntaxhighlight:? {? title:?'添加或更新代碼',? sourceTab:?'代碼',? langLbl:?'選擇語言',? advancedTab:?'高級(jí)',? hideGutter:?'隱藏分割線',? hideGutterLbl:?'隱藏分割線和行號(hào)',? hideControls:?'隱藏工具欄',? hideControlsLbl:?'隱藏浮動(dòng)工具欄',? collapse:?'代碼折疊',? collapseLbl:?'默認(rèn)折疊代碼塊?(需要啟用工具欄)',? lineWrap:?'自動(dòng)換行',? lineWrapLbl:?'關(guān)閉自動(dòng)換行',? autoLinks:?'自動(dòng)鏈接',? autoLinksLbl:?'不自動(dòng)轉(zhuǎn)換超鏈接',? lineCount:?'起始行號(hào)',? highlight:?'高亮行號(hào)',? highlightLbl:?'輸入以逗號(hào)分隔的行號(hào),?如?<em>3,10,15</em>.'? }? });
五、新建plugin.js文件,該文件是ckeditor插件必須得文件,里面是對(duì)該插件的一些配置,代碼如下:?
代碼如下:
CKEDITOR.plugins.add("syntaxhighlight",?{? requires?:?[?"dialog"?],? lang?:?[?"cn"?],? init?:?function(a)?{? var?b?=?"syntaxhighlight";? var?c?=?a.addCommand(b,?new?CKEDITOR.dialogCommand(b));? c.modes?=?{? wysiwyg?:?1,? source?:?1? };? c.canUndo?=?false;? a.ui.addButton("Code",?{? label?:?a.lang.syntaxhighlight.title,? command?:?b,? icon?:?this.path?+?"images/syntaxhighlight.gif"? });? CKEDITOR.dialog.add(b,?this.path?+?"dialogs/syntaxhighlight.js")? }? });
六、由于dedecms 5.7自己集成了一個(gè)dedepage插件,用來添加ckeditor自定義插件,在/include/ckeditor/dedepage文件夾下,打開plugin.js文件在最后面添加:?
requires : [‘syntaxhighlight’],其中syntaxhighlight為代碼高亮插件的文件夾名,添加完之后的代碼如下:?
[code]? //?Register?a?plugin?named?"dedepage".? (function()? {? CKEDITOR.plugins.add(?'dedepage',? {? init?:?function(?editor?)? {? //?Register?the?command.? editor.addCommand(?'dedepage',{? exec?:?function(?editor?)? {? //?Create?the?element?that?represents?a?print?break.? //?alert('dedepageCmd!');? editor.insertHtml(" ");? }? });? //?alert('dedepage!');? //?Register?the?toolbar?button.? editor.ui.addButton(?'MyPage',? {? label?:?'插入分頁符',? command?:?'dedepage',? icon:?'images/dedepage.gif'? });? //?alert(editor.name);? },? requires?:?[?'fakeobjects'?],? requires?:?['syntaxhighlight']? });? })();? [/code]
七、修改/include/ckeditor/ckeditor.inc.php文件,在$toolbar[‘Basic’]數(shù)組的最后一行添加元素Code,修改后代碼如下:?
代碼如下:
$toolbar['Basic']?=?array(? array(?'Source','-','Templates'),? array(?'Cut','Copy','Paste','PasteText','PasteFromWord','-','Print'),? array(?'Undo','Redo','-','Find','Replace','-','SelectAll','RemoveFormat'),? array(?'ShowBlocks'),array('Image','Flash'),array('Maximize'),'/',? array(?'Bold','Italic','Underline','Strike','-'),? array(?'NumberedList','BulletedList','-','Outdent','Indent','Blockquote'),? array(?'JustifyLeft','JustifyCenter','JustifyRight','JustifyBlock'),? array(?'Table','HorizontalRule','Smiley','SpecialChar'),? array(?'Link','Unlink','Anchor'),'/',? array(?'Styles','Format','Font','FontSize'),? array(?'TextColor',?'BGColor',?'MyPage','Code')? );
至此,編輯器的修改已經(jīng)完成,修改后的syntaxhighlight文件夾文件目錄結(jié)構(gòu)圖如下圖:
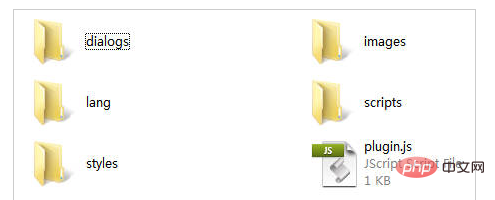
將syntaxhighlight文件夾上傳到/include/ckeditor/plugins/文件夾下,打開后臺(tái),添加文章試一下,看看編輯器的上最后一行是否出現(xiàn)了如圖所示的按鈕:

點(diǎn)擊按鈕彈出如下圖所示的對(duì)話框輸入代碼,并且可以切換到高級(jí)選項(xiàng)對(duì)代碼高亮顯示做一些配置:
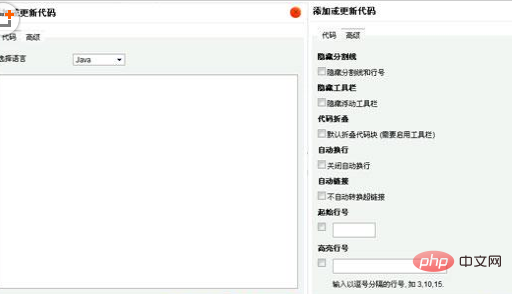
八、但是光這些還不夠,還要在文章模板文件/templets/default/article_article.htm文件里引入高亮顯示的筆刷JS文件和CSS文件,由于是需要引入很多JS,所以建議將引入的代碼放在

.jpg)












.png)
